
How to Drill Holes and Install T-Nuts for a Climbing Wall
Drilling Holes and Installing T-Nuts Into Your Home Climbing Wall
Drilling holes into your new home climbing wall is one of the most important steps of the process, luckily, it is also one of the easiest! On this page, we will go step-by-step to creating the bolt holes and installing the t-nuts properly.

Tools You Will Need
- Safety glasses and ear plugs
- Power Drill
- 7/16" Forstner Bit
- Portable Drill Guide (I recommend the Milescraft DrillMate)
- Tape Measure
- Pen or Pencil
- T-nuts (if using more affordable 4-prong t-nut you will need a hammer, if using the commercial 2-hole t-nuts you will need a phillips driver head for your power drill)
- Optional: Chalk line, Sawhorses, and clamps
What We Will Use These Tools For:
- You will use the power drill to drill the holes and, if you choose higher-end commercial t-nuts, use it again to install the screws to attach your t-nuts.
- The 7/16" forstner bit is highly recommended because it cuts clean holes without splintering the plywood. You can use a spade bit but it tears the holes.
- The portable drill guide ensures every hole is cut at a 90° angle. This is extremely important as you need your climbing holds to be square on the board.
- The tape measure will be used if you want to systematically place the holes on the wall in a pattern. There is nothing wrong with a random pattern either, your choice!
- Pen/pencil will be used to mark where you want to drill a hole
- T-nuts will be installed after the holes are drilled. These 3/8" x 16 inserts are what your bolt-on climbing holds will screw into.
- Optional: a chalk line will help you quickly square up your holds. Be warned, the chalk doesn't come off easily but a wet rag will help. Sawhorses get your plywood boards off the ground, and if you doing more than one board at a time (recommended), use clamps to keep the boards together and prevent veneer tear-out when drilling holes.
Drilling Holes for Your Climbing Wall
Have you decided what pattern you want? For most home woodies (walls), a 5"x5" or 6"x6" pattern works great. The more holes, the more climbing options but the downside is increased cost up-front to buy the t-nuts. My recommendation, drill more holes than you think you will need, it will give you more options for climbing movement down the road.
All home climbing walls should be built from quality 3/4" plywood. I do not recommend composite or MDF boards as they are not strong or durable enough for consistent use. If you aren't doing random hole patterns, use your tape measure and pencil (or chalk line) to mark the locations of your holes on the FRONT face of your plywood sheet.
Pro Tip: to save a ton of time, you can clamp 2 to 3 plywood sheets together at a time. That way, you only drill each hole once and it will cut through all the boards. Put the boards on your sawhorses, square them up to each other, and clamp them down. I would make sure all the plywood has the FRONT face pointing up to keep the "tear-out" to a minimum.
All holes must be 7/16." Attach the Forstner bit to your drill guide and the drill guide to your power drill. From there, cut the holes in a systematic fashion. Take your time and run the drill at full speed to get the best cut. The video below shows how easy this is.
Installing T-Nuts In Your Climbing Wall
If Installing 4-Prong T-Nuts
Once your holes are cut, separate the plywood sheets and set them on the floor, FACE DOWN. Clean up the backside of the plywood as much as you can, exposing the holes you drilled. with your hands, push the t-nuts into the holes as far as you can and then drive the t-nut in by striking it with a hammer. The t-nut installation is complete when it sits fairly flush in the plywood.
Downsides to using 4-prong t-nuts:
The installation method to installing the t-nuts with the hammer will invariably leave some of your t-nuts crooked in the holes and unusable for climbing holds down the road. Really take your time doing this portion of the installation and it will pay dividends. After continued use (aka, putting climbing holds on and off the wall many times) the 4-prong t-nut are also prone to ripping out the backside of the plywood and "stripping" out the wood, making retrieving your holds difficult. If this doesn't sound appealing to you, I would recommend using the higher-end t-nut shown below.

If Installing Commercial T-Nuts
These are my favorite t-nut and make life so much easier. Yes, they are incrementally more expensive, but if you plan on taking holds on and off your wall (to reset boulder problems) frequently, you won't regret making this choice.
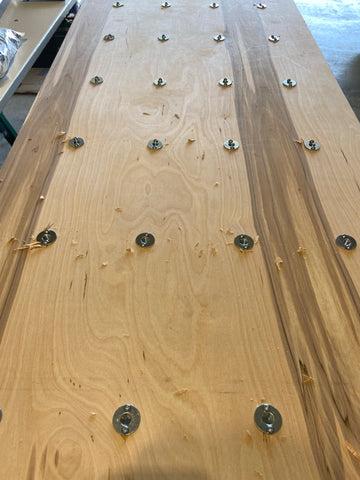
Once your holes are cut, separate the plywood sheets and set one of them on the sawhorses, FACE DOWN. Simply put the t-nut into the hole and then use the screws provided to attach them to the plywood.

Here is a quick video on how easy these are to install:
Voila! T-nuts are installed and ready for action. If you have questions, Contact Us, we are happy to help. If you are in the process of building a home climbing wall, we would love to help supply your climbing holds. You can support us by buying our high-quality climbing holds here.
Disclaimer: Rock climbing is inherently dangerous, so please do so at your own risk. Any information you read here is only a suggestion. You are the person responsible for creating a safe climbing wall for you and anyone using it. We are not responsible for any injuries or complications caused by using our products.